Controls
Main Control Cabnet
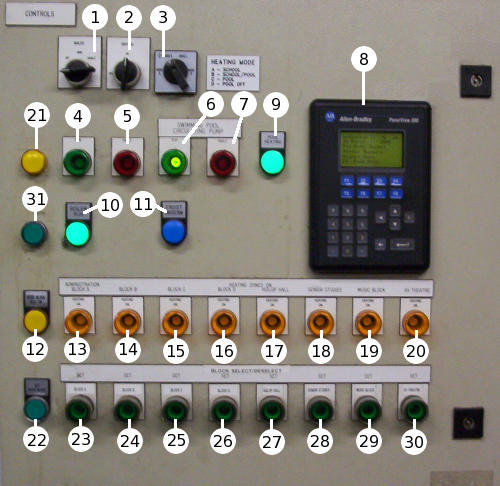
 1. Control Switch
Auto
Off
Manual
Kindle
2. Heating
On
Off
3. Mode Switch
Mode A: School
Mode B: School/Pool
Mode C: Pool
Mode D: Pool Off
4. Primary Pump Run Lamp
5. Primary Pump Fault Lamp
6. Pool Pump Run Lamp
7. Pool Pump Fault Lamp
8. Panelview
9. Pool Heating Lamp
10. Boiler Run Lamp
11. Frost Protection Lamp
12. Inter Block Heat Lamp
13. Block A Heat Lamp
14. Block B Heat Lamp
15. Block C Heat Lamp
16. Block D Heat Lamp
17. Hyslop Hall Heat Lamp
18. Senior Studies Heat Lamp
19. Music Block Heat Lamp
20. AV Theatre Heat Lamp
21. tech block heat lamp
22. Inter Block Select Button/Lamp
23. Block A Select Button/Lamp
24. Block B Select Button/Lamp
25. Block C Select Button/Lamp
26. Block D Select Button/Lamp
27. Hyslop Hall Select Button/Lamp
28. Senior Studies Select Button/Lamp
29. Music Block Select Button/Lamp
30. AV Theatre Select Button/Lamp
31. Tech Block Select Button/Lamp
 1. Control Switch
Auto: In this position the boilers will run autonomously.
Off: In this position the boilers will not run, but are not to be
considered isolated electrically.
Manual: This position is now redundant. If selected the boilers will run
uncontrolled
Kindle: This position is now redundant. If selected the boilers will run
uncontrolled
2. Heating
This switch is now redundant in relation to controlling the plc.
3. Mode Switch
Mode A: School: In school mode the boilers will heat the school only,
as and when required by the settings in the panelview.
Mode B: School/Pool: This setting will cause the boilers to heat both
the school and the pool simultaniously.
Mode C: Pool: Heats the pool only.
Mode D: Pool Off: This signifies that the pool is not to be used as a
heat sink. I believe this would be better described as "school not pool".
4. Primary Pump Run Lamp
This lamp will be illuminated when the primary circulating pump is
running.
5. Primary Pump Fault Lamp
This lamp will be illuminated if the primary pump becomes overloaded.
6. Pool Pump Run Lamp
This lamp will be illuminated when the pool circulating pump is
running.
7. Pool Pump Fault Lamp
This lamp will be illuminated if the pool pump becomes overloaded.
8. Panelview
The primary means of controlling the settings for the plc.
9. Pool Heat Lamp
This lamp will be illuminated when the pool is calling for heat.
10. Boiler Run Lamp
This lamp will be illuminated when the boilers are running.
11. Frost Protection Lamp
This lamp will be illuminated if the temperature outside falls below
the frost protection thermostat setpoint. If this happens, all valves
will open and both circulating pumps will run continuously. The boilers
will not be asked to run, but will not be stopped from doing so if they
would normally have been running.
12. Inter Block Heat Lamp
This lamp will be illuminated if the Inter Block is calling for heat.
13. Block A Heat Lamp
This lamp will be illuminated if Block A is calling for heat.
14. Block B Heat Lamp
This lamp will be illuminated if Block B is calling for heat.
15. Block C Heat Lamp
This lamp will be illuminated if Block C is calling for heat.
16. Block D Heat Lamp
This lamp will be illuminated if Block D is calling for heat.
17. Hyslop Hall Heat Lamp
This lamp will be illuminated if Hyslop Hall is calling for heat.
18. Senior Studies Heat Lamp
This lamp will be illuminated if Senior Studies is calling for heat.
19. Music Block Heat Lamp
This lamp will be illuminated if the Music Block is calling for heat.
20. AV Theatre Heat Lamp
This lamp will be illuminated if the AV Theatre is calling for heat.
21. Tech Block Heat Lamp
This lamp will be illuminated if the Tech Block is calling for heat.
22. Inter Block Select Button/Lamp
This button is used for selecting the zone when the panelview has put
the plc into instant heat mode. When the zone is selected the button
will become illuminated.
23. Block A Select Button/Lamp
This button is used for selecting the zone when the panelview has put
the plc into instant heat mode. When the zone is selected the button
will become illuminated.
24. Block B Select Button/Lamp
This button is used for selecting the zone when the panelview has put
the plc into instant heat mode. When the zone is selected the button
will become illuminated.
25. Block C Select Button/Lamp
This button is used for selecting the zone when the panelview has put
the plc into instant heat mode. When the zone is selected the button
will become illuminated.
26. Block D Select Button/Lamp
This button is used for selecting the zone when the panelview has put
the plc into instant heat mode. When the zone is selected the button
will become illuminated.
27. Hyslop Hall Select Button/Lamp
This button is used for selecting the zone when the panelview has put
the plc into instant heat mode. When the zone is selected the button
will become illuminated.
28. Senior Studies Select Button/Lamp
This button is used for selecting the zone when the panelview has put
the plc into instant heat mode. When the zone is selected the button
will become illuminated.
29. Music Block Select Button/Lamp
This button is used for selecting the zone when the panelview has put
the plc into instant heat mode. When the zone is selected the button
will become illuminated.
30. AV Theatre Select Button/Lamp
This button is used for selecting the zone when the panelview has put
the plc into instant heat mode. When the zone is selected the button
will become illuminated.
31. Tech Block Select Button/Lamp
This button is used for selecting the zone when the panelview has put
the plc into instant heat mode. When the zone is selected the button
will become illuminated.